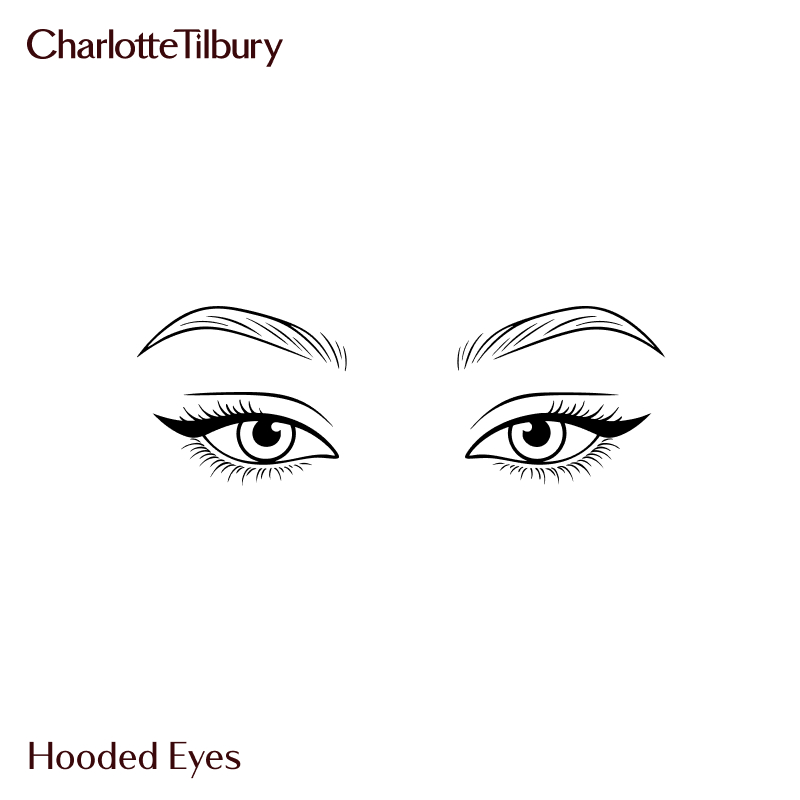
Maquillage pour les yeux + ligneur pour paupières tombantes

Découvrez des conseils d'experts et des astuces pour appliquer le fard à paupières et le ligneur lorsqu'on a les paupières tombantes, et apprenez à créer mon Feline Flick signature.

Darlings, quelle que soit la forme des yeux, tout le monde, PARTOUT peut créer un regard envoûtant! Si vous avez les paupières tombantes, vous aurez peut-être du mal à tracer des traits de ligneur, mais lisez la suite pour découvrir mes conseils et astuces d'experte. Apprenez à appliquer le fard à paupières et le ligneur sur les paupières tombantes et créez des looks sublimant le regard qui ne se transfèrent pas, ne bavent pas et ne disparaissent pas!

Photo de mannequin portant un maquillage pour paupières tombantes

Qu'appelle-t-on paupières tombantes?

Si vos paupières sont cachées par un pli naturel de la peau, c'est ce qu'on appelle avoir les paupières tombantes. Certaines personnes naissent avec des paupières tombantes, tandis que d'autres voient leurs paupières tomber davantage avec l'âge, lorsque la peau autour des yeux commence à s'affaisser. Comme les plis apparaissent tels une « capuche » sur votre paupière, cela peut être problématique lors de l'application du ligneur, car il arrive souvent que l'effet souhaité ne soit pas obtenu ou qu'il soit plus difficile à parfaire.

Graphique paupières tombantes

Les personnes aux paupières tombantes rencontrent généralement les problèmes suivants lors de l'application du ligneur : le trait de ligneur est caché par le pli de la paupière, il s'étale et se transfère sur d'autres parties de l'œil, et il est difficile de créer un trait parfait.

Darlings, grâce à mes conseils et astuces, vous pourrez découvrir comment appliquer un trait de ligneur pour les paupières tombantes et obtenir le regard que vous aimez!

Trucs et astuces pour l'application du ligneur sur les paupières tombantes

Si vous souhaitez créer un fabuleux feline flick, découvrez mes conseils d'experte pour appliquer parfaitement le ligneur sur les paupières tombantes! Avec les bons outils et les bonnes techniques, il est facile de donner aux paupières tombantes le look classique d'un trait félin!

Maquillage Pillow Talk pour paupières tombantes – nature morte

CONSEIL MAGIQUE #1 : Détendez vos yeux

Gardez les yeux naturellement détendus sans hausser les sourcils ni étirer la peau. Étirer les plis de vos yeux peut vous permettre d'obtenir une surface plus lisse sur laquelle travailler, mais le trait que vous tracez deviendra alors invisible ou décalé lorsque vos yeux reviendront à leur position naturelle.


CONSEIL MAGIQUE #2 : Allez-y léger!

Sur les paupières tombantes, l'application du ligneur doit être aussi fine que possible. Pour que le ligneur soit visible sur des paupières tombantes, il faut l'appliquer de manière précise et bien définie, de façon à accentuer le regard sans pour autant perdre le trait. Appliquez un trait fin de ligneur, aussi près que possible de la ligne des cils pour obtenir de meilleurs résultats. L'application d'une plus grande quantité de produit augmente également le risque de transfert sur les autres parties de l'œil, alors appliquez votre ligneur de manière nette et légère!


CONSEIL MAGIQUE #3 : Faites-le durer

Utilisez un ligneur longue tenue qui ne bave pas. Le ligneur Feline Flick offre une formule ultra-mate résistante à l'eau qui est parfaite pour créer des traits de ligneur qui durent longtemps.


CONSEIL MAGIQUE #4 : N'ayez pas peur de vous lancer!

En regardant droit devant vous, n'ayez pas peur de suivre la ligne des cils inférieure et d'étendre votre ligneur pour tricher un peu afin de créer un effet félin. Utilisez la pointe de votre sourcil comme guide, et faites glisser votre ligneur vers le haut et vers l'extérieur jusqu'à ce qu'il s'aligne avec la pointe de votre sourcil.


CONSEIL MAGIQUE #5 : Un à la fois

Terminez un œil avant de passer à l'autre. Cela contribuera à la symétrie générale de votre look et vous donnera un modèle à reproduire de l'autre côté de votre visage.


CONSEIL MAGIQUE #6 : Vous pouvez toujours corriger vos erreurs de ligneur!

Si vous faites une erreur avec votre ligneur, vous pouvez utiliser Magic Eye Rescue et un coton-tige pour nettoyer la zone environnante. Faites glisser le coton-tige le long du trait que vous avez tracé pour éliminer les bavures et affiner les lignes afin qu'elles soient impeccables.

Tutoriel pour créer un trait félin sur des paupières tombantes

  1. Eye graphic showing how to apply eyeliner for hooded eyes

    Step 1: Assume the Perfect Position for Applying Eyeliner

    Before you begin applying eyeliner, position yourself in front of a mirror and relax your face. The best way to apply eyeliner is with a natural facial expression. Look forwards without raising your eyebrows or stretching your skin and visualise where the most flattering eyeliner placement will be for your hooded eyes. My perfect eyeliner placement is to follow an invisible line from the lower lash line up to the tail of the brow - this is the perfect guide for every winged eyeliner look!

  2. The Feline Flick liquid eyeliner with a precise pen tip perfect for winged eyeliner

    Step 2: Flick Upwards and Outwards from the Outer Corner

    Taking The Feline Flick, my precision-tip liquid eyeliner, draw a thin line that travels from the outer corner of your eye, gliding diagonally to create a lift-effect liner that goes upwards and outwards. The line should be straight rather than curved to create a sharp and precise angle that will become your wing.

    Winged eyeliner is an optical illusion! If your eyes have deeper folds that disguise the outer corner, glide your eyeliner over the top to map out where your winged liner will sit. Keeping your eye in a natural position will help you here as it will reveal the natural folds that you’re working to counter.

    Shop The Feline Flick

  3. The Feline Flick liquid eyeliner in Panther with cap on

    Step 3: Join your Feline Flick with your Lash Line

    To complete the shape of your winged eyeliner, trace a line from the tip of your wing that connects back into the lash line. You’ll want to follow a similar angle to the first line, starting at the outer-most point and landing nearer towards the middle of the eye. Keeping your eyeliner thin and slick will define the look of your eyes while also minimising the risk of your liner drowning out the look of your hooded eyes and colouring them in fully without accentuating their shape.

  4. Une palette de 6 teintes de fards à paupières ouverte, dans des tons nude chatoyants et mats avec couvercle orné d'un miroir.

    Step 4: Fill in the Empty Space

    Once you’re happy with your feline flick, take your liquid liner and black out the centre of your wing. Use an opaque, lacquered eyeliner like The Feline Flick to do this step to get the most precision and definition out of your eyeliner look, and when applying, be careful to stay inside the lines you’ve created to form the sharpest eyeliner look you can.

    Tilbury Tip: If you are worried about transfer, I’d recommend using the Super Nudes Easy Eye Palette to set down your eyeliner. With my Eye Liner Brush, use the black shade in this magically matte eyeshadow palette and tap off any excess, then pat the colour on top of your liner to mattify and build up even more opacity.

    Shop Super Nudes Easy Eye Palette

  5. Model wearing a winged eyeliner look using The Feline Flick in Panther

    Step 5: Draw a Thin Line from the Inner Corner

    Connect your winged eyeliner and your inner corner by running your eyeliner across the lash line. Using the precision tip of The Feline Flick, glide the liquid formula across the upper lash line from the inner to the outer corner, staying as close as possible to the root of the lashes. This will help to accentuate the look of the eyes and ground your winged liner into your eye look, while being mindful not to overwhelm the eyelid and get lost under the hood.

    Shop The Feline Flick

  6. Mascara in a pink-coloured tube with its gold-coloured lid with a black applicator next to it.

    Step 6: Finishing Touches

    Are you happy with your winged eyeliner, darlings? If not, you can always use a cotton bud and Magic Eye Rescue to remove any makeup mistakes, or Charlotte’s Beautiful Skin Radiant Concealer to tidy up any lines that have been led astray!

    When you’ve perfected your winged liner, finish the look by applying a brightening eyeliner like the nude shade in The Super Nudes Duo Liner to the waterline for bigger and brighter -looking eyes, as well as lashings and lashings of Pillow Talk Push Up Lashes! mascara on the top and bottom lashes for the look of enhanced length, lift and volume!

    Shop Pillow Talk Push Up Lashes!

    Shop The Super Nudes Duo Liner

Découvrez les conseils de maquillage de pro pour les paupières tombantes

Darlings, si vous cherchez d'autres trucs et astuces rapides et faciles pour créer des looks adaptés aux paupières tombantes, découvrez les conseils d'experts de ma fabuleuse artiste pro, Rasheena!

  1. Le Supermodel Brow Kit de Charlotte comprend un gel teinté pour les sourcils, un crayon pour les sourcils et un gel de fixation transparent

    1. Enhance Your Brows

    To lift the look of your eyes, create a SUPERMODEL BROW! It’s as simple as FILL, FEATHER, and FIX! Thicker, fuller, fluffy looking, brows will instantly make eyes appear uplifted, brighter, and more open!

    First, create shape, structure, and define the look of your brows with Brow Lift, or use Brow Cheat to fill in gaps and elongate brow structure by mimicking hair-like strokes. Next, add the appearance texture and tint for fuller-looking brows with Legendary Brows, an expert tinted brow gel. Coat and define every hair (including tiny baby hairs!) by brushing in upward motions. Lastly, set your brow in place with Brow Fix, a clear brow gel that delivers hold with invisible finish.

    Shop Charlotte’s Supermodel Brow Kit

  2. Charlotte's Eye Smudger Brush is a domed, synthetic brush that's perfect for precise application

    2. Tilt Your Chin Up (or Down) While Applying Eye Makeup

    When you’re applying eyeshadow on your lids, lift your chin up and look down into your mirror so you can see your full eyelid. On the flip side, if you’re working on the bottom of your eyes, tilt your chin down. By doing this, you’re more likely to be able to apply your products with precision on the largest surface area of your eyes and without smudging!

    Shop eyeshadow brushes

  3. Luxury Palette in Pillow Talk Dreams with four dreamy, rosy-brown shades

    3. Apply Eyeshadow Past the Crease

    Don’t be afraid to apply eyeshadow above the crease to make eyes look lifted and wider! People with hooded eyes often have a smaller visible eyelid when looking straight on, meaning some of the eyeshadow you apply can get hidden! The trick is to apply eyeshadow a little past the eyelid, up into and past the crease, and then blend upwards and outwards! Using the Eye Blender Brush, apply your eyeshadow from side to side on the lid like a windshield wiper, but don’t only stay on the lid, apply your favorite shades up and out!

    This can be done with both cream and powder eyeshadows! Use Eyes to Mesmerize miracle pots, which are perfectly crease-proof and super easy to use, or choose your favorite Luxury Palette to make your hooded eyes appear brighter and more beautiful than ever!

    Tilbury Tip: Eyes to Mesmerise now comes in globally loved shades: Walk of No Shame, the universally flattering russet-red and Pillow Talk, the pretty pink beauty secret to mesmerizing, SHINE BRIGHT eyes in seconds!

    Shop Eyes to Mesmerize cream eyeshadows

    Shop Luxury Palettes

  4. Charlotte's Eye Blender Brush is a fluffy brush that's perfect for getting a seamless blend

    4. Don’t Forget the Lower Lash Line

    Bringing your eyeshadow along your lower lash line beautifully complete your look! When you’re applying to the bottom lash line, it’s important to not be heavy handed, especially if you have hooded eyes. Using the same shade you’ve applied on your upper eyelid, use the Eye Smudger Brush to lightly bring the colour along your lower lash line and don’t forget to blend, blend, blend!

    Shop the Eye Blender Brush

    Shop all eyeshadow

  5. Eyes to Mesmerise cream eyeshadow pot in glistening Rose Gold

    5. Add Sparkle to the Inner Corners

    This trick instantly opens up the look of your eyes for a brighter, wider looking, sparkling gaze! When using your favorite Luxury Palette, use the PRIME shade in the inner corners to create the illusion of bigger, brighter-looking eyes, or use the dream-sheen, sparkling Eyes to Mesmerize cream eyeshadows for a luminous looking, wide-eyed look!

  6. Pillow Talk Eyeliner is a berry-brown pencil eyeliner inspired by Charlotte's iconic Pillow Talk shade

    6. Winged Eyeliner for Hooded Eyes: Keep Eyes Open!

    A feline flick is one of my favorite beauty secrets for bigger, brighter, lifted looking eyes! For hooded eyes, Rasheena recommends keeping your eyes open as you apply your eyeliner, so you can see where the product will be when you’re looking straight ahead.

    Start by drawing a dot about two milimeters above your upper lash line on each side of your eye so your flick will curve up at a 45-degree angle. Next, line your eyes until you connect the line straight up to the dot and over the crease. Then, with your chin up, retrace and fill in the line to make sure there are no gaps!

    Shop eyeliner

    Discover my full winged eyeliner tutorial

Darlings, un feline flick est toujours fabuleux, peu importe la forme de vos yeux! Maintenant que vous avez découvert mes astuces pour appliquer parfaitement le ligneur sur les paupières tombantes, tout est une question de pratique! Apprenez à connaître la forme de vos yeux et expérimentez de nouvelles façons de faire RAYONNER les paupières tombantes!

Partager l'article

Publications connexes