How To Blend Contour Makeup

Contour makeup is the secret to a chiselled look. Read on to discover how to blend contour makeup for perfect definition with a flawless-looking finish.

How To Blend Contour Tips

When it comes to contour, blending your product correctly is so important! After all, you’re essentially drawing lines onto your face and playing with light and shadow to visibly create the illusion of shape, definition and enhancement. If you don’t soften and diffuse those lines correctly, it’s a huge beauty misstep!

Read on to discover my MAGIC contour blending tips to help you reshape, resize, enhance and define the look of your facial framework for a flawless-looking, Hollywood-inspired complexion…


Don’t apply too much contour

When it comes to contouring, start with less product and slowly build it up to create more enhancement as you go. The last thing you want is unflattering harsh lines being centre-stage of your look, darling! Fortunately, my Hollywood Contour Wand has a buildable and blendable formula, making it easier to create a perfectly contoured look with a naturally blended finish.

Make sure you’re using the right shade

Darlings, it’s so important to use the right shade of contour for your skin colour! My Hollywood Contour Wand is available in Light to Medium and Medium to Deep, making it easy to perfectly match your contour with your complexion.

As a rule, your contour should be one or two shades darker than your natural skin tone. If you use a contour that’s too light or dark, it’ll be much harder to blend it into your natural complexion!

Discover your perfect contour shade

Choose the best contour formula for you

When building your contour, don’t mix powders and liquid products together as they can be difficult to blend together and you’re more likely to create an uneven, patchy finish!

If you’re contouring with a liquid contour product like my Hollywood Contour Wand, complete your cheek makeup with a liquid blush and highlighter like the award-winning Beauty Light Wand. Contouring with powder? Create your chiseled look using beautifying powder formulas like my Airbrush Bronzer.

Always use the right tools

Using the correct beauty tools for contouring provides the ultimate beauty finish! My dense, precise Hollywood Complexion Brush effortlessly buffs and blends my Hollywood Contour Wand formula to perfection for a FLAWLESS Hollywood contour look!

If you’re creating a contoured, bronzed finish using my Airbrush Bronzer, use The Air-Brush Bronzing Brush, a Kabuki-style retractable bronzer brush that will give you a SEAMLESS and AIRBRUSHED application in seconds! If your contour product of choice is my Beautiful Skin Sun-Kissed Glow Bronzer with hyaluronic acid, lightly buff the cream formula onto your skin in circular motions using the Beautiful Skin Bronzer Brush.

Take your face shape into consideration

It’s important to keep your face shape in mind to achieve the most flattering contour look for you!

If your face is angular, soften your look by applying a darker shade from your ears down to your chin and blend. Is your face oval-shaped? Create the appearance of a shorter jawline by applying a darker shade to your chin and jawline area and blending in the product from there.

Apply your makeup in the correct order

Never dive into your contouring! For contour to work its MAGIC, it must be applied in the correct order as part of your beauty ritual. This way, all of your beauty products can better complement each other and blend together more seamlessly.

Click here to discover the correct order of makeup application.

Always use a setting spray

Darlings, one of the secrets to a FLAWLESS contour look is making the look last! Airbrush Flawless Setting Spray is an oil-free, lightweight and hydrating setting spray that primes and sets your makeup in place for up to 16 hours! Simply spritz it over your entire face after you’ve finished your full makeup application to LOCK IN your beautiful contour look with no creasing, fading or melting!

Blend a little more!

Blending your contour makeup is essential, so take your time! If you don't, you could end up with unflattering harsh lines all over your face – no thank you, darling! Read on to discover my step-by-step guide to how to blend your contour makeup…

How To Blend Contour Makeup Step by Step

For a perfectly sculpted looking complexion, your contour must be blended correctly! Follow my step-by-step guide for flawless-looking contour application and beautiful blending…

  1. Wonderglow is an illuminating primer that gives the skin a soft-focused, luminous finish

    MAGIC STEP 1: Create a Seamless Canvas

    For your contour to work its magic, it’s important that your base is in place! Follow my skincare order guide to NOURISH, HYDRATE and PRIME your skin before applying your makeup! After applying primer, disguise any blemishes, correct uneven skin tone and smooth the look of your skin with my collection of colour correctors, concealers and foundations.

    Shop primers

  2. An open, liquid contour wand in a deep bronze-coloured, reflective packaging with a soft, sponge-tip applicator at the end and its lid next to it.

    MAGIC STEP 2: Decide on your Look

    The next step is to decide on the contour look you want to create. If you’d prefer more of a matte finish to your flawless contouring, choose a powder formula like Airbrush Bronzer, a powder bronzer with hyaluronic acid that makes matte bronzing easy!

    If you prefer a liquid contour, choose my Hollywood Contour Wand and use it with my Beauty Light Wand for an easy liquid contour and highlight.

    Tilbury Tip: If you’re new to contouring, choose my Hollywood Contour Wand as its lightweight, buildable, creamy contour formula is easy to blend!

    Shop contour makeup

  3. An open bronzer compact with a mirrored-lid in a rich chocolate brown shade, perfect for deep skin tones.

    MAGIC STEP 3: Map your Face

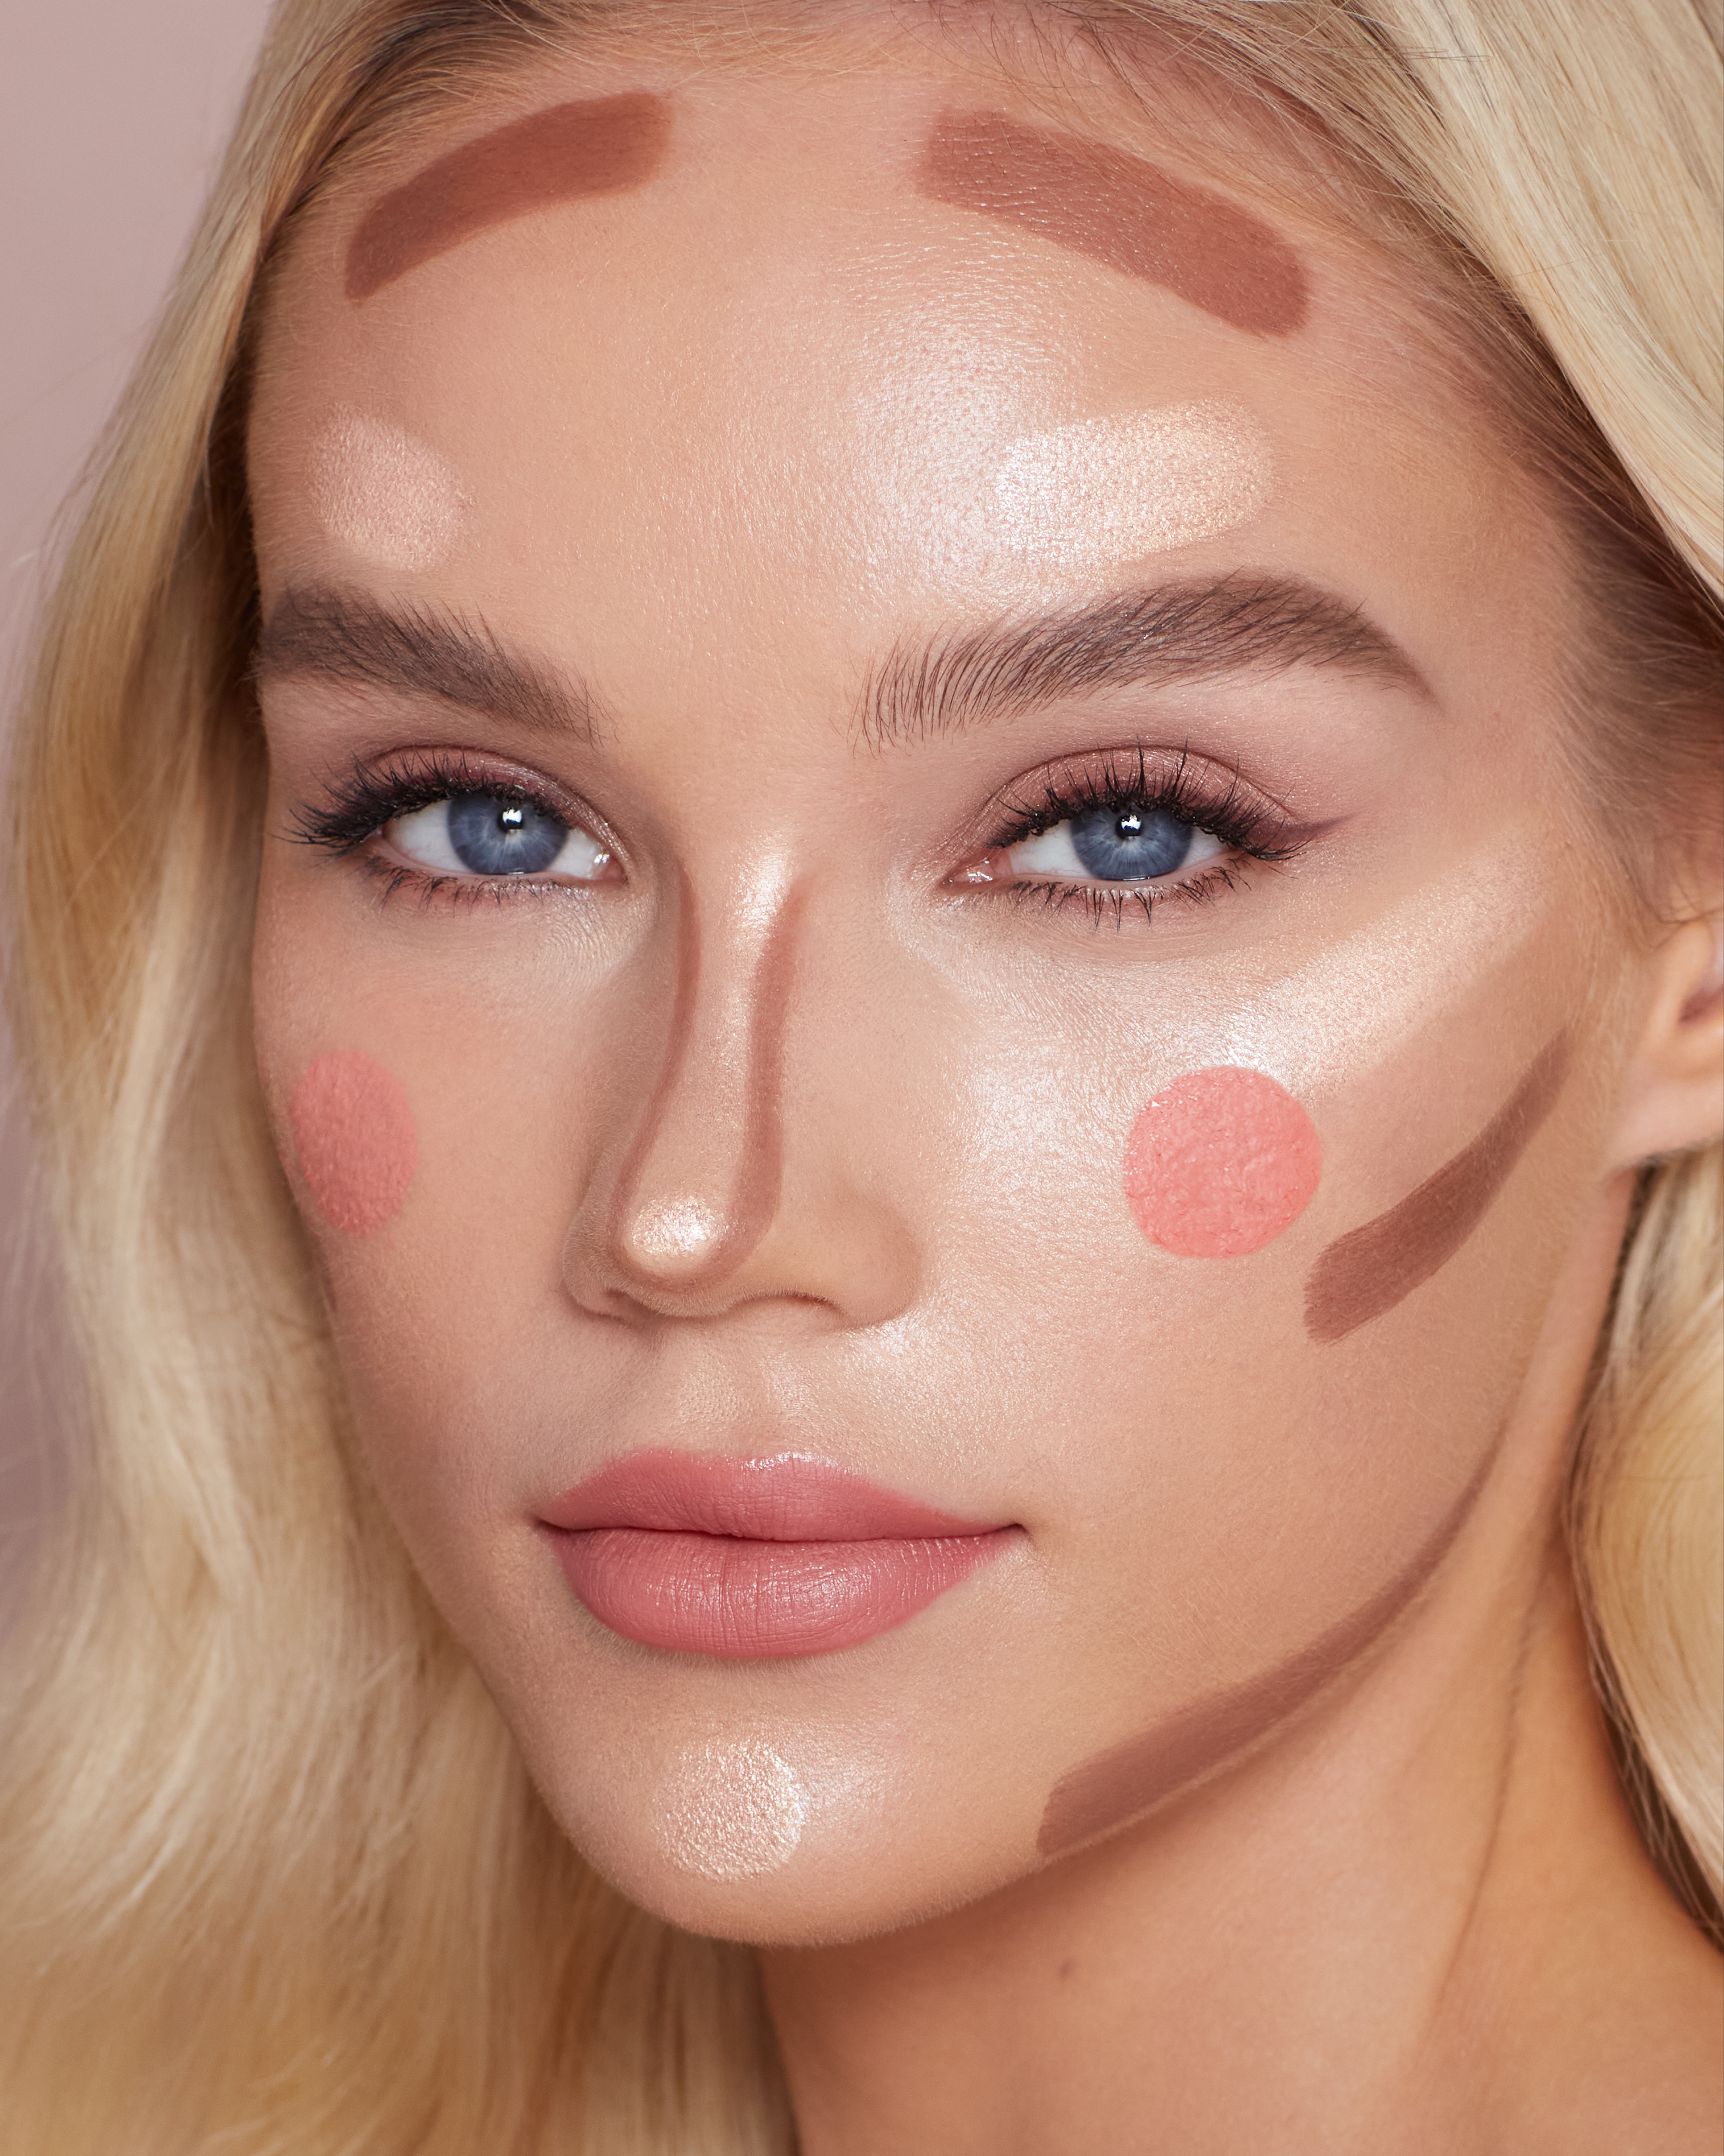
    Always map your face before contouring, concentrating on the places where contouring works best! This includes the hollows of your cheeks, sides of your temples, under your jawline and the side of your nose and hairline. Read the how to contour tutorial to discover MAGIC tips and tricks for creating a perfectly sculpted and contoured looking complexion.

    Learn more about contouring

  4. Hollywood Complexion Brush, a double-ended, synthetic makeup brush for blending out creams and liquids

    MAGIC STEP 4: Blend, blend, blend

    And now for the most important step in contouring… blending! The number one rule with blending your contour is that there’s no such thing as over-blending.

    Simply take your larger cheek brush to blend in your contour on your cheeks, jawline and temples, tapping it in small circular and sweeping motions to soften harsh lines for a seamless finish. Then, use a brush with an angled small head, like my Hollywood Complexion Brush to contour your nose and other small sections for FLAWLESS-LOOKING contour with zero streaks, paying attention to the edges of where you applied your product to buff away any harsh lines.

    Don’t forget to apply your contour in small amounts and slowly build it up until you get your desired look! Between each and every application, always blend in the product for BREATHTAKING contoured beauty with a flawless finish.

    Tilbury Tip: Wondering what the difference is between contouring and bronzing? My ultimate guide to bronzer vs. contour tells you everything you need to know.

    Shop Hollywood Complexion Brush

  5. An open highlighter powder compact with a mirrored lid, in a shimmery copper-gold shade.

    MAGIC STEP 5: POP! with Highlighter

    Always add a highlighter after applying your contour makeup! This glow-giving complementary product will help to add GLOW to the areas of your face that light naturally hits, accentuating your careful contour work with contrasting highlights.

    Once you’ve contoured and blended, simply apply my Beauty Light Wand to your cheekbones, down the centre of your nose and in the inner corners of your eyes and browbone. Then, buff in the product using the Hollywood Complexion Brush for a perfectly ILLUMINATED complexion.

    If you’ve created your contour look using a powder formula, achieve a GORGEOUS, GLOWING finish with my Hollywood Glow Glide Face Architect Highlighter, applying this sparkling powder highlighter to your cheeks, jawline, the inner corner of your eyes, down your nose and under your brow for skin that LOOKS GLOWING, LIFTED and RADIANT!

    Shop highlighters

    Discover where to apply highlighter

  6. Airbrush Flawless Setting Spray is Charlotte's weightless, makeup-fixing mist that lets you party all night and stay all day

    MAGIC STEP 6: Lock in your Look

    Darlings, now it’s time to lock in your look with the Airbrush Flawless Setting Spray! Simply spritz this oil-free, lightweight and ultra-hydrating setting spray onto your face from 6 to 8 inches away to keep your contour (and the rest of your makeup) in place all day long!

    Shop Airbrush Flawless Setting Spray!

Share article